At the heart of a blog are its posted entries. These can range from journal-style writing exercises to political commentary to jazz appreciation. The blog’s concept and style are entirely up to the author(s). Once you have your great idea, it’s time to post!
Please note: The block editor (“Gutenberg”) was introduced more than 2 years ago, and as such the previous “Classic” editor is being phased out. Our documentation will no longer include instructions for its use.
Posts vs. pages
Posts are timely entries that generally display in reverse-chronological order in the blog. Most of the content of a blog is generally added as a post, and people who subscribe to your blog will get updates on new posts (but not pages).
Pages are used to display static content about the site, such as details about the concept behind the blog, the authors, etc.
Create a new post/page
Watch all three videos in the series.
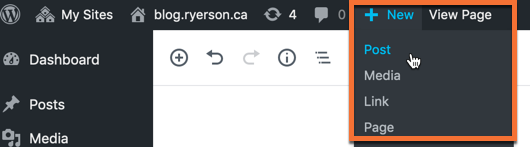
- Look at the top of the page, for the menu bar.
- Click the ‘+ New’ menu item, then select what you want to create (post or page).
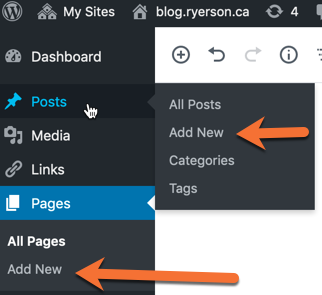
Don’t see the menu bar?
- Go to the Dashboard of your blog.
- In the left-hand menu, click either “Posts” or “Pages”.
- Click “Add New”.
Which version are you using?
Right now, there are two different editors on our WordPress blogs. Take a look at the images below, and determine whether your blog is using the “Gutenberg” block editor or the “Classic” editor.
Skip to instructions for creating a post/page using the “Classic” editor.

The elements of the “Gutenberg” post/page editor
We’re slowly switching over our website content to include Gutenberg-specific instructions. Until then…
Get started with Gutenberg!
Learn about the new Gutenberg Interface
(from gogutenberg.com)
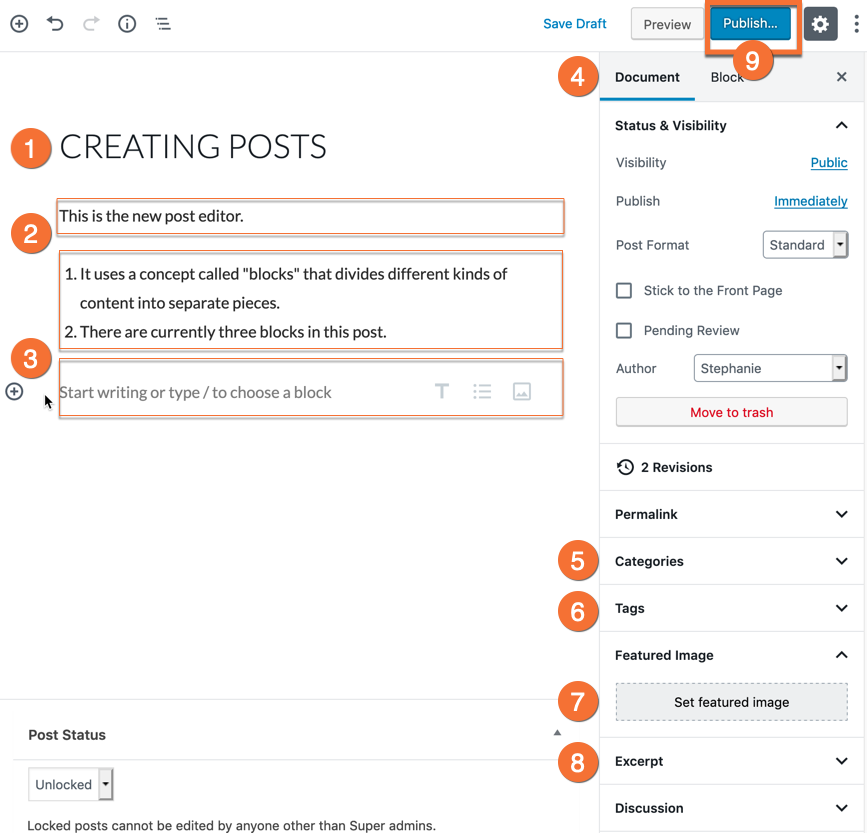
- Post title –
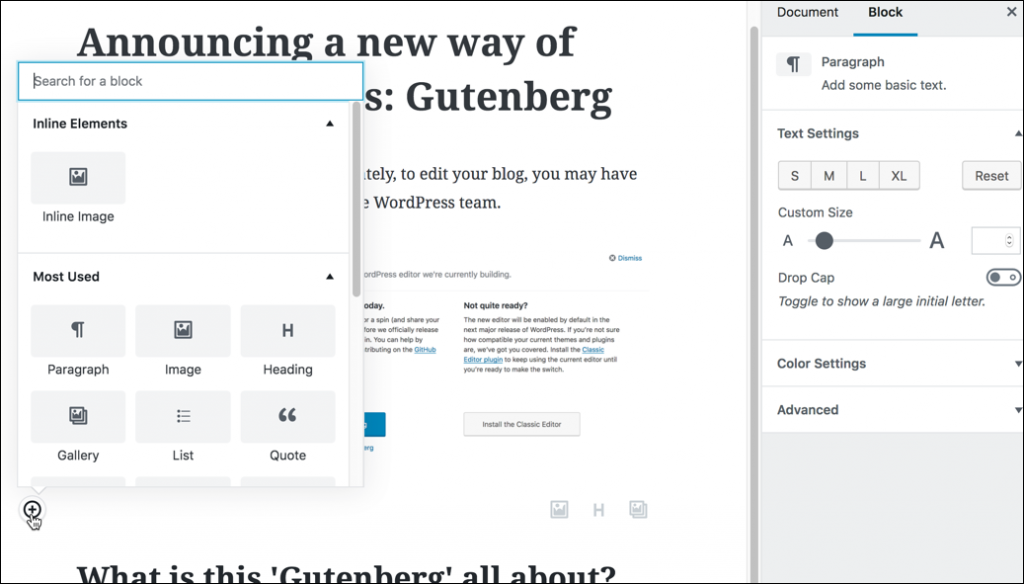
- Content “blocks”. There are many different kinds of blocks for different kinds of content. Some of the ones you will use the most are ‘Paragraph’, ‘List’, ‘Heading’ and ‘Image’. Note that there are three blocks in this example, as identified by the outlines.
- Click the + icon for a list of the various types of blocks you can add. Otherwise, clicking ‘enter’ on your keyboard will automatically generate a new paragraph block with quick links to switch it to a header, a list or an image.
- Settings panel – switch between ‘document’ settings and ‘block’ settings. The block settings will change depending on the block you have selected. Each block has different settings that you can control.
- Categories – these are labels that you can use to group your posts together. Categories represent the high-level sections of content that make up your blog site. These should be pre-determined by the person designing the blog (often the Instructor, in the case of a course blog). You should always select an appropriate category when creating a new post.
- Tags – these are keywords that allow you to group your posts in a more granular way – similar to the way we use hashtags in social media. Unlike Categories, these should be created by the person authoring the post, and should represent important topics that are highlighted in the post. It is best to select just a few tags for a post.
- Featured image – depending on the theme you use, the featured image is a great way to add a visual to your post. Click the link and select an image from the media library or upload a new image.
- Other settings – other settings may appear here, depending on the kinds of plugins you have enabled. Be sure to review these items so that you understand what elements can be controlled.
- PUBLISH! – This button allows you to publish your post. Note the section on “Status & Visibility” just below the button – this allows you to publish at a future date, create private posts and more.
Watch all three videos in the series.
The elements of the “Classic” post/page editor
These instructions will only be useful if you have activated the “Classic Editor” plugin. Otherwise, please see the instructions related to the default editor, “Gutenberg”.
Title
Type the title of your post/page into the top field.
Content editor
In the larger box in the middle, type your entry. Notice that there are two tabs attached to the top of this box: Visual gives you editing features similar to ones you might find in your favourite word processing program; and Text allows you to type or paste in HTML code for more advanced formatting. Most of us will use the Visual tab.
Excerpt (post only)
The Excerpt feature allows you to specify a smaller piece of text that will be displayed on the main page of your blog, instead of showing the whole post. This can be useful if your entry is really long, or if you would prefer to show portions of more entries on your main page. This feature is optional – simply leave it blank if you don’t wish to use it. (This is only available for posts, not pages)
Tags & categories (post only)
On the right-hand side, you will see sections for adding Tags and/or Categories. We will address these in more detail on another page, but here is where you would type in any tags (a.k.a. keywords) and/or select any categories that may apply to the contents of this post. (This is only available for posts, not pages)
Discussions (to enable commenting)
Scroll down to the Discussion section. If you do not wish to have people leave comments on this post/page, please uncheck the box for the option “Allow comments”.
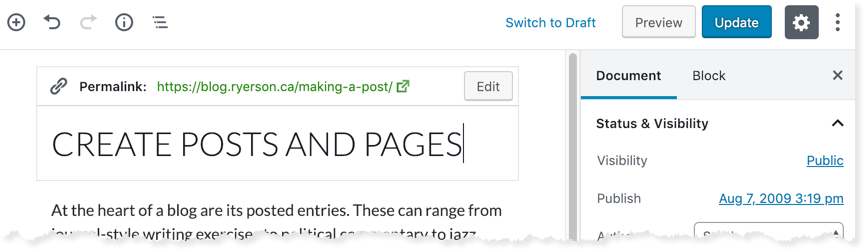
Publishing options
Scroll all the way back to the top, and look at the Publish section in the upper right-hand corner. Here, you can choose to save your post/page as a Draft if you aren’t yet ready to publish it, as well as Preview it to see how it might look once published. You can also set a date in the future for your post to be published, by clicking Edit next to“Publish Immediately” and selecting a publish date.
If you are happy with your post and would simply like to publish it, click the Publish button.
Next steps
If you wish to add images or multimedia to your post, please see the section on how to Add images and media.